Knife Sharpening Demystified.
Hey, it's your Uncle Zip with another tip!
Working with a sharp knife or tool makes the work safer and more enjoyable. Most people know that they should sharpen their knives but with all the products and gimmick it takes as long to figure out what you need and how to use it as it does to learn the skills to effectively sharpen.
If you just want the TLDR version check out the method in the video below. It's a tried and true method that can be done with about any flat sharpening stone you may come across.
This method works to maintain an edge, but it doesn't get into how to put an edge on something from scratch nor does it equip you with the knowledge of why it works. In my opinion, if you want truly to understand something you should be able to improvise your own methods by understanding what it fundamentally requires.
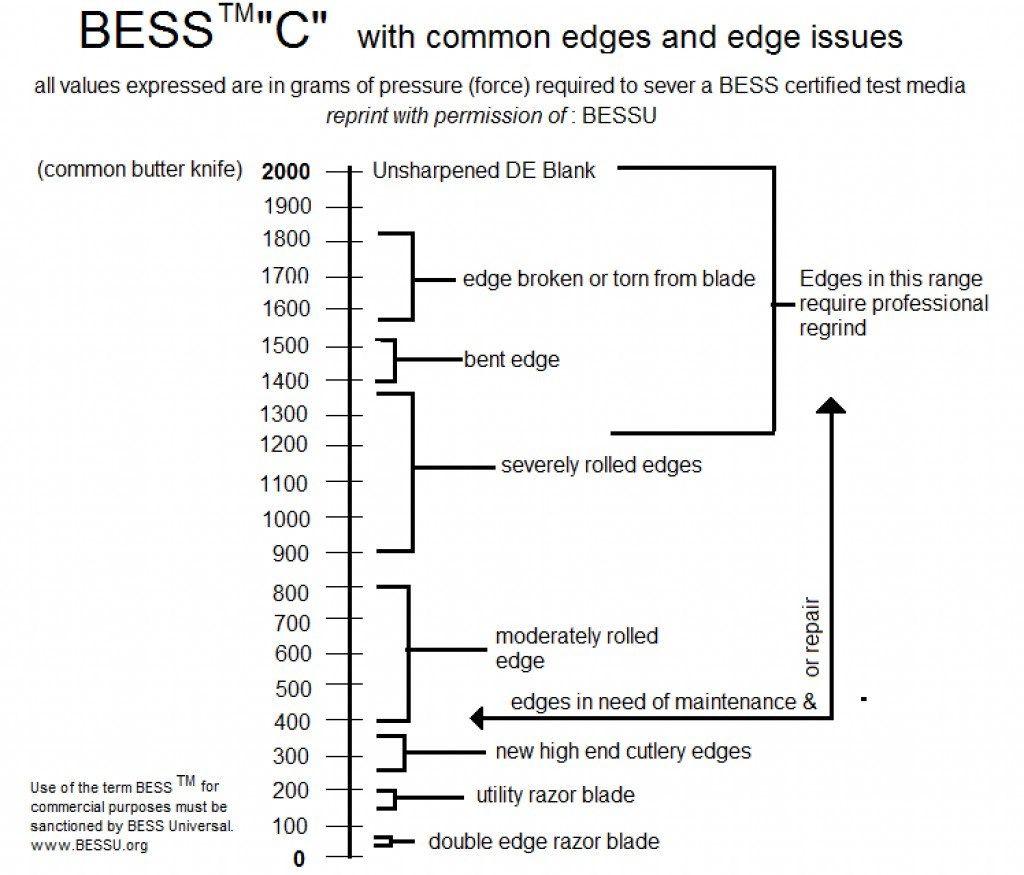
Before discussing how to sharpen I think it is important to define what sharpness is. For this, we will define the sharpness as the pressure in grams required to sever a BESS-certified test media using the edge apex.

The testing equipment to do this is surprisingly more approachable than most testing equipment such as the edge-on-up PT50 series testers running between $140 and $280
Now, as you can see in the BESS chart, anything above 1200 requires a regrind. The main takeaway from this is that any sharpening gizmo that uses electricity is likely made to address re-grinding. For sake of brevity, I will not consider this to part of the topic of sharpening because a tool like a work sharp eliminates the need 99% of the skill required to accomplish this well.
Ignoring grinding, there are still 2 major aspects to the topic.
- Sharpening
- Polishing
Because many people use each of these terms in many ways and many products can accomplish more than one of these functions I will define each.
Sharpening
Using an abrasive to remove material to develop an apex and a bur. This is quite adequately described in the following video.
For this, I prefer a 1200-1500 grit 'hard Arkansas stone' or equivalent. Once a bur is established and brought true to center you enter into polishing.
Note: When following the sharpening technique shown above I often use the same stone for sharpening by using moderate pressure and only lightly wetting the stone and polishing by using very light pressure and additional water. This is absolutely sub-optimal but with practice will reliably result in sharpness between 200 and 300 which I find very acceptable for day-to-day use.
Polishing
Using sequentially higher grit abrasives, reduced pressure, or increased lubrication to hone a pre-established bur at the apex of an edge.
Polishing can be accomplished in a huge variety of ways, a leather or denim strop loaded with polishing compound (also called jewelers rouge) is one of the most economical and reliable methods.
Now that you know how sharpening works you can improvise your sharpening tools pretty easily by just thinking about what things could work. Some commonly available improvised sharpening tools include the unglazed foot of ceramic dishware, sandpaper glued to a piece of glass, or the porcelain portion of a spark plug. The world is your sharpener!
You absolutely do not need any fancy sharpening gizmo but if you care to know what I use, I wear a whetstone necklace that I use for day-to-day maintenance and I keep a Falkniven CC4 in my pack for when things need a more serious touch-up.
If you made it this far, thanks for taking the time to read the tips I have to offer. If you're interested in knowing when I publish new tips please feel free to subscribe and I'll send you an email each time I post a new tip.